> For the complete documentation index, see [llms.txt](https://docs.mercuri.cx/llms.txt). Markdown versions of documentation pages are available by appending `.md` to page URLs; this page is available as [Markdown](https://docs.mercuri.cx/features/conversations-inbox/copy-of-interactive-message-options-for-whatsapp-conversations.md).
# Copy of Interactive Message Options for WhatsApp Conversations
This section covers the different interactive message formats available, including quick reply buttons, call-to-action (CTA) links, list messages, and user location requests.
WhatsApp Interactive Messages
### Use of Interactive WhatsApp Messages
Interactive message types enhance customer experience and operational efficiency. Here’s how they help:
* **Faster Responses:** Customers can reply with a single tap using quick reply buttons or lists.
* **Higher Engagement:** Structured options guide users, reducing drop-offs and confusion.
* **Streamlined Workflows:** Use CTAs to direct users to specific actions like visiting a website or calling support.
* **Accurate Inputs:** Location request buttons reduce manual errors by letting users share their live location.
***
### Types of Interactive Messages
1. **Request Location:** *Ask users to share their location with a single tap for services like delivery or support.*
* Click on the **Interactive Messages** option > **Request Location.**
* Before sending the **Request Location** message, you can modify the prefilled message as needed. Then, click on **Send**.
Interactive Message : Request Location
***
2. **CTA URL Button:** *A button that directs users to a specific URL, like a website or promotional page.*
* Click on the **Interactive Messages** option > **CTA URL Button.**
* Fill in the required details to create a message with a call-to-action (CTA) button.
* **Add Header (Optional)**
* Choose the type: **Text**, **Image**, **Video**, or **Document**.
* Enter your **Header Text**, e.g., `Order tracking`.
* **Write the Body (Required)**
* Type your message content in the **Body** section.
* Example: `Your order has been dispatched! Tap below to track it.`
* **Add Footer(Optional)**
* A **Footer** can be included, such as a disclaimer or a closing note.
* **Configure the CTA Button**
* **Button Text:** Enter a label for the button, e.g., `TRACK ORDER`.
* **Button URL:** Add the destination link, e.g., `https://example.com`.
* **Preview the Message**
* A live preview appears on the right to show how the message will look on WhatsApp.
* **Send the Message**
* Click the **Send** button to send the message.
Interactive Message : CTA URL Button
***
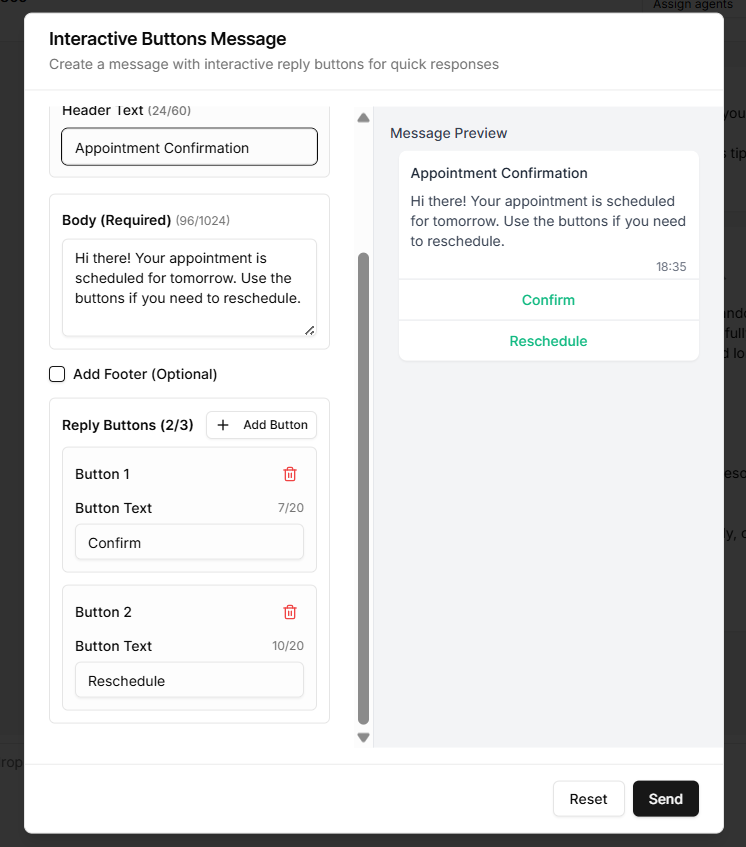
3. **Buttons**: *Predefined response options that users can tap to quickly interact, like confirming a choice or answering a question.*
* Click on the **Interactive Messages** option > **Buttons.**
* Fill in the required details to create a message with an interactive reply button.
* **Add Header (Optional)**
* Choose the type: **Text**, **Image**, **Video**, or **Document**.
* Enter your **Header Text**, e.g., `Appointment Confirmation`.
* **Write the Body (Required)**
* Type your message content in the **Body** section.
* Example: `Hi there! Your appointment is scheduled for tomorrow. Use the button if you need to reschedule.`
* **Add Footer(Optional)**
* A **Footer** can be included, such as a disclaimer or a closing note.
* **Configure the Button**
* **Button Text:** Add labels for the buttons, e.g. `Confirm / Reschedule.`
* **Preview the Message**
* A live preview appears on the right to show how the message will look on WhatsApp.
* **Send the Message**
* Click the **Send** button to send the message.
Interactive Message : Buttons
***
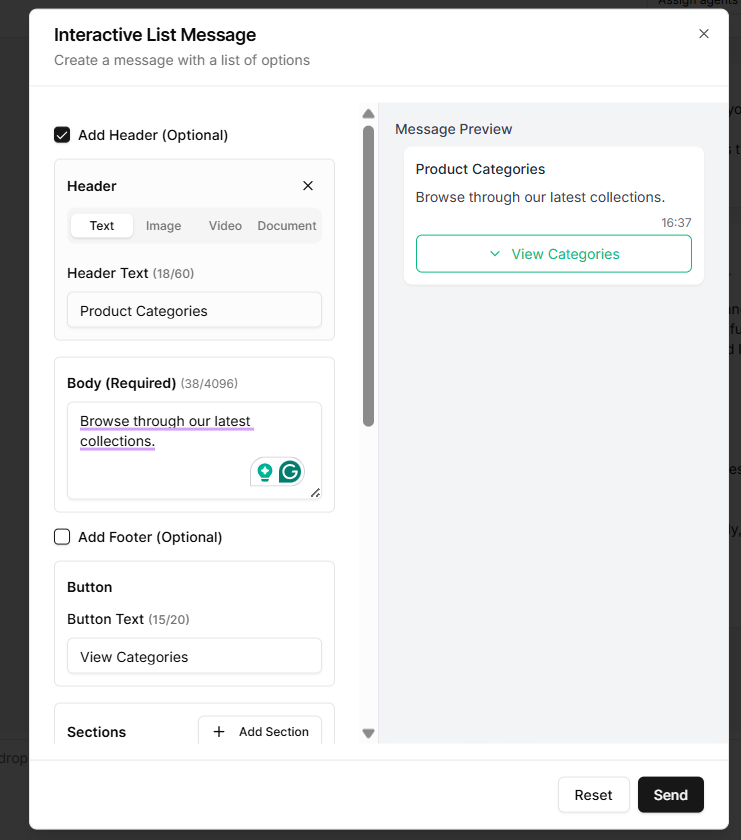
4. **Lists**: *The Interactive List Message displays a structured list of options for the user to view. It is designed to present multiple choices clearly, but is not intended for user selection or input.*
* Go to **Interactive Messages** and select **List Message**.
* In the **Body (required)**, add a brief message to introduce the list (e.g., *“Browse through our latest collections”*).
* Enter the **Button Text** that users will see (e.g., *“View Categories”*).
* Under **Sections**, click **Add Section** and provide a **Section Title** (e.g., *“Electronics”*).
* Click **Add Row** to input list items with:
* A **Title** (e.g., *“Mobile Phones”*)
* An optional **Description**
* (Optional) Enable and enter **Footer Text** if additional context or a disclaimer is needed.
* Click **Send** to deliver the message.
***Note:** Interactive List Message can include multiple sections, with up to 10 rows (items) per section and a maximum of 10 sections, allowing businesses to present a broad range of options in a well-organized format.*
.png?alt=media&token=5a850ab9-3610-4097-961b-8da8598d4fd4)