> For the complete documentation index, see [llms.txt](https://docs.mercuri.cx/llms.txt). Markdown versions of documentation pages are available by appending `.md` to page URLs; this page is available as [Markdown](https://docs.mercuri.cx/communication-channels/whatsapp-integration/onboarding-on-whatsapp-business-1.md).
# Onboarding on WhatsApp Business
### Prerequisites for Onboarding to WhatsApp Business API with Mercuri
Before integrating WhatsApp Business API with Mercuri CX , ensure you have the following requirements ready. This will streamline the onboarding process and help you quickly activate your WhatsApp Business account.
* **Facebook Business Manager Account:** Must be verified. [Verify here](https://business.facebook.com/settings)
* **Phone Number:** During WhatsApp Business onboarding on Mercuri CX, you’ll need to provide a phone number , this can either be a standalone number or one that’s already associated with a WhatsApp Business account
* **Payment Profile:** Have a **credit card** ready and your **business information** (e.g., **GST Number**) to complete the payment setup.
***
### Onboarding Process
**Step 1: Start the WhatsApp Business Onboarding**
1. From the Mercuri CX dashboard, go to **Settings** and select **Channels**.
2. Click the **Onboard WhatsApp channel** button to begin the onboarding process.
3. You will be redirected to **Meta's Embedded Signup flow** (powered by Facebook).
**Step 2: Create or Link Your WhatsApp Business Account**
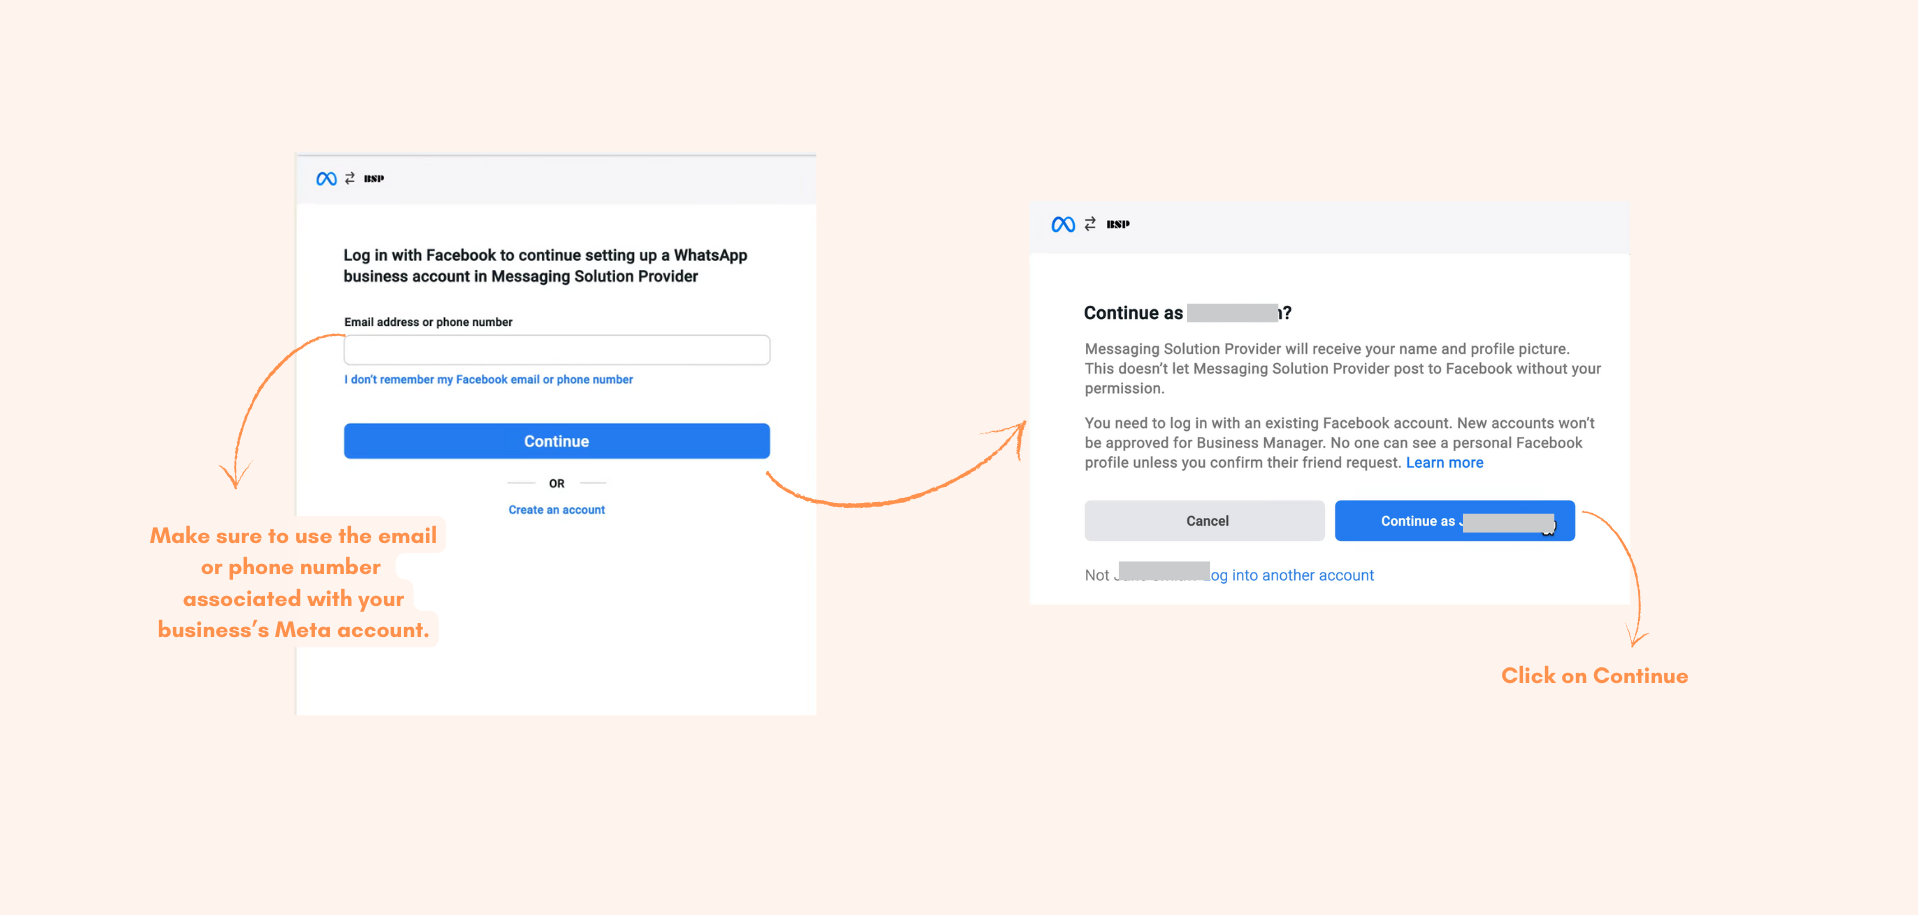
1. **Log in with Facebook:**
Log in with Facebook
* Sign in using your Facebook credentials. Ensure you log into the account that manages your business on Meta.
1. **Create or Link Your Business Manager:**
* If you already have a Business Manager account, select it from the list.
* If you don’t have one, click **Create New Business** and follow the on-screen instructions.
***
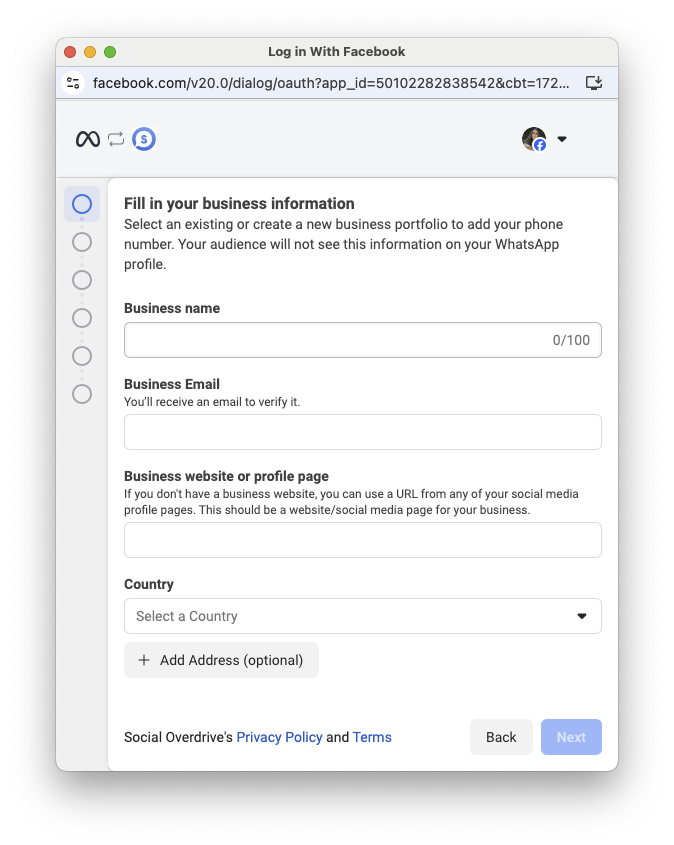
**Step 3:Fill in your business information**
1. Enter your business details, including:
* Business Name
* Business Address
* Industry Category
2. Follow Meta’s prompts to complete the business verification process.\
\&#xNAN;*(Note: Business verification is required to activate WhatsApp Business API.)*
***
**Step 4: Connect your existing WhatsApp Business App or add a new phone number**
***There are two ways to onboard to the WhatsApp Business API:***
A. Connect your Existing WhatsApp Business App
{% hint style="info" %}
**⚠️ Not Supported in These Countries**
Currently, this flow **won’t work** if your WhatsApp Business number has a country code from:
* **Australia, Japan, Nigeria, Philippines, Russia, South Korea, South Africa, Turkey**
* Any country in the **European Union (EU)**, **European Economic Area (EEA)**, or the **United Kingdom (UK)**
{% endhint %}
Many businesses already use the **WhatsApp Business App** to communicate with their customers. Now, it's possible to **onboard using the existing WhatsApp Business account and phone number**.
Select **Connect your existing WhatsApp Business App** to proceed.
**What This Flow Lets You Do:**
* Use the **same number** you're already using on the WhatsApp Business App.
* Send messages at scale.
* Still reply 1:1 via your WhatsApp Business App.
* Keep your **chat history synced** across both platforms.
**Steps to follow to onboard with the existing WhatsApp Business App :**
1. Select **Connect your existing WhatsApp Business App.**
2. After selecting the option to use your **existing WhatsApp Business number** and enter the phone number.
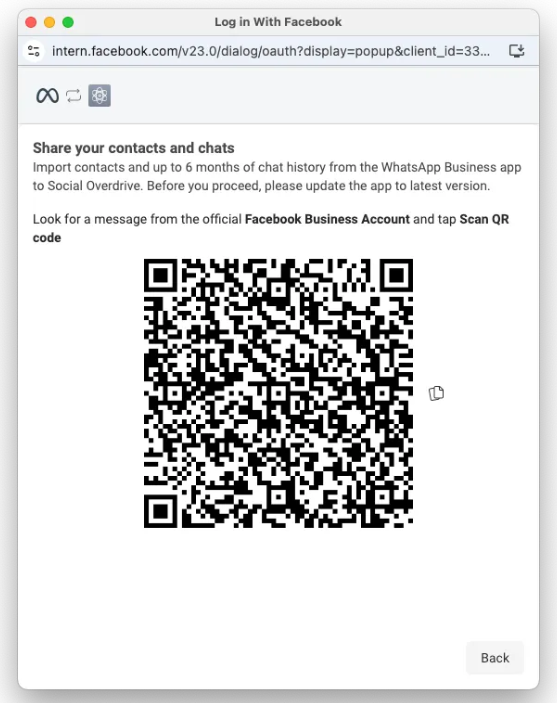
3. After entering the phone number, a **QR code screen** will appear.
4. At the same time, you'll receive a message on your WhatsApp Business App from Meta.\
Open that message and tap on the **“Scan QR Code”** button to scan the QR code displayed on the screen.\\
5. **Click on “Scan QR Code”** in the message you receive on your WhatsApp Business App.
6. **Connect to the Business Platform**: This will open a page prompting you to scan the QR code shown on your screen to complete the **connection to the business platform.** On that page, once again, click **Scan QR Code** to proceed and establish the link.
5. After clicking **Scan QR Code**, a pop-up will appear asking whether you want to share your **chat history** with the Business Platform.
* Tap **Share chats** to allow past messages to be visible on the Business Platform.
* Tap **Don’t share chats** if you prefer to keep previous messages private.
***Note: This choice is final and cannot be changed later.***
6. Success Screen: Click **"Add Payment Method"**, then select **"Finish"** to complete the onboarding process.
*If you don’t have an existing WhatsApp Business number, you can onboard using a new number by following the steps in section* **B. Start with a new WhatsApp number**
**Want to know how to set up Payment Method for WhatsApp Business API,** [***Click here***](/communication-channels/whatsapp-integration/faq.md#how-to-add-a-payment-method-for-whatsapp-business-api)
B. Start with a new WhatsApp number
This option allows businesses to onboard by **adding a new phone number** instead of using an existing WhatsApp Business App account.
1. Enter the phone number you want to use for the WhatsApp Business API and choose your preferred verification method—either via text message or phone call.
2. Once selected, you must complete the verification to continue with the setup.
3. **Permissions Review Screen**: Next, the **Permissions Review Screen will appear.** This screen displays a summary of the permissions your business is about to grant. Click on **Continue**
4. **Success Screen:** Click **"Add Payment Method"**, then select **"Finish"** to complete the onboarding process.
**Want to know how to set up Payment Method for WhatsApp Business API,** [***Click here***](/communication-channels/whatsapp-integration/faq.md#how-to-add-a-payment-method-for-whatsapp-business-api)
***
**Step 5: Configure Messaging**
1. Select a display name for your WhatsApp Business profile (e.g., your business name).
2. Add a profile picture, business description, and working hours to complete your WhatsApp profile.
3. Configure automated messaging templates such as:
* Order confirmations
* Appointment reminders
* Support messages
***
**Step 6: Complete Integration with Mercuri**
1. After completing the setup on Meta, you will be redirected back to Mercuri.
2. Link the verified WhatsApp number to your Mercuri account.
3. Test your WhatsApp messaging capabilities via the **Mercuri Conversations** to ensure everything is working correctly.
***
**Step 7: Start Messaging**
* Use Mercuri’s conversation inbox to send and receive WhatsApp messages with customers.
* Automate messages based on CRM triggers or use pre-approved templates for campaigns.